Posts

Flowering quince_Trunk it...

Image
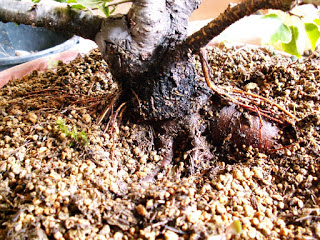
Typical Chaenomeles has a shrubby look and this is reflected in a vast majority of bonsai made from this plant.  As the life is not always straightforward,  there are exceptions from any rule.  No surprise there are as an exception also flowering quinces with trunks.  Sometimes the trunk is just made from a taproot that is gradually exposed to the life above the ground.   And this was the case with this plant.  2013 Driving on a highway,  I have spotted some red flowering shrubs on the sideways.   Flowering quinces scattered on the rocky earthwork surrounding the highway.  Roots squeezed between the rocks, no chance to collect without preparation.  I have selected one plant, removed rocks around the thick root and replace them with nice soil.   Then,  during the summer weeks I have stopped there now and then bringing some water.    Spring 2014 Collection.   First few rakes into the soil have revealed a lot of nice tiny roots.  Great!? No.  One of the first things you learned

Easy peasy_Air layer_Prunus mahleb_A try #2

Image
I have made the first air layer attempt  in spring 2016.   Just a single growing season after the collection.   The result?  Well, not a complete failure. But something quite close to it. If interested to get more details, please visit the initial article  here .  Air layer 2016_result 2017   Attempt #2 Winter 2017 Result?  A bunch of new roots encircling the trunk.  So, this is much better.   I will keep the original roots in place till the next spring.    The main task for now is to protect all the new tender roots against the frost.  Very often there is a hard frost in January without any snowbed.  Too harsh for young seedlings or as I believe for young roots formed by the air layer.    In fact,  there is a lot of information HOW to make the air layer.  But not so much on the aftercare.  How to sustain/improve/prune  the newly formed roots to get a healthy plant with a  flared trunk and a nice spread of surface roots.   So to cover this part briefly: In case of a groun

Biggest blackthorn in my collection_Little John

Image
Yes, it is a Blackthorn.  Not a Yamadori in its true sense but  definitely one of  the biggest I have ever seen as a potensai.  Little John. I have been circling around this blackthorn for a number of years.  Perhaps more than 10?    In fact,  this was the first blackthorn of this size I have managed to find at a location suitable for collection.   Then I  found and collected another one of similar size,  but with better character.  So this one has stayed on the radar nevertheless I have not set any date for the collection.  The situation  changed some time ago.  Me stupid have "drowned" the poor beast.  Still feeling guilty.  Guilty and stupid.  I hate loosing trees... Collected 2016 Winter look_December 2017.  Minutes before my Makita, Dremel, pliers, chisels and saws came into action. First round of  carving finished.  I guess this is enough for this year.  For the time being I only plan another round of carving on the jin on the left side. 

Wood plates_Some of the finished ones

Image
BURLS Birch Ash More details in the OFFER page

Ji-ita. Ready to be used.

Image
I have left the wood plates at the time when they were resting to get rid of the major part of its natural moisture.   ( the first part  here  ) Once the process is completed you can enter the stage of a real craft. Sanding Down from grit 80/100 to 220.  No jumps over the individual grit sizes to avoid scratches. Carving the groove Few blisters is the lesser cost of this work.   The chisels can do much more harm if they enter any soft tissue... Carving the edges... ...to get rid of some excess material and/or to fine tune parts of the outer sides... Staining or painting Once you have finished the carving of the edges you can paint them.  Also you can stain or paint the surface to enhance the structure of the wood. OK, that is for the craft part.  Now we need to change the hat to become a chemist. Penetration First of all I must highlight the fact that this part can get extremely nasty if  safety rules are not followed.    An acrylic resin is the mag

Roots over rock_a season from the start

Image
I am moving more and more from Homo sociologicus  to Homo collecticus. Yamadori  to start with. But in recent months I have enlarged the radius of my objects of interests to pieces of deadwood and stones.   Sometimes quite heavy load for my back to carry. Addiction of any sort is dangerous... Having a lot of nice rocks it has not taken too much time to get to the point where I have started thinking about connecting the rocks with the wood.  Live wood in this case. Root Over Rock.  Or ROR  if you like. As it is with any other new project you need A QUICK WIN.   Something that gives you confidence and boosts your determination to scramble up on a higher level.  A Berberis thunbergii atropurpurea looks OK for this purpose. Autumn 2017. How we did get there.... Shopping list Spring 2017:     Seedling with a reasonable lengthy roots,  a piece of rock, sphagnum moss, plastic tape and shade cloth. Summer 2017 Autumn 2017 Roots before combing with

Boxwood_Buxus sempervirens_Eight years of life in a pot

Image
In the early 90' we have bought some boxwood  to plant a hedge in our front garden.   Some of the surplus shrubs have been planted in the backyard in case they will be needed later on.   At the time I have started with bonsai I have been searching the yard for any possible candidate and one or the boxwood has attracted my attention. Reversed taper and  problematic straight branches were  not a problem for my heart under fire and eager hands... Clearly,  the brain had nothing to say at that time. 2013 The reversed taper is not a big problem now.  The branch with accute angle attracts too much attention 2015 A lot of space for birds to fly through the crown... Nevertheless the foliage has covered the problematic branch. Getting the shape. 2017 I guess we are +/- there.  It needs a bit of pruning to fine tune the pads,  but this will wait till the spring. Height: 45 cm